I use HooMD-Blue to simulate colloidal particles and visualize their trajectory using Ovito Basic. The output trajectory from HooMD is saved as a GSD file. If the Python HooMD code specifies recording the diameter in the GSD trajectory (this doesn’t happen automatically and needs to be explicitly defined), the particles are correctly sized in Ovito’s 3D view, and everything works perfectly.
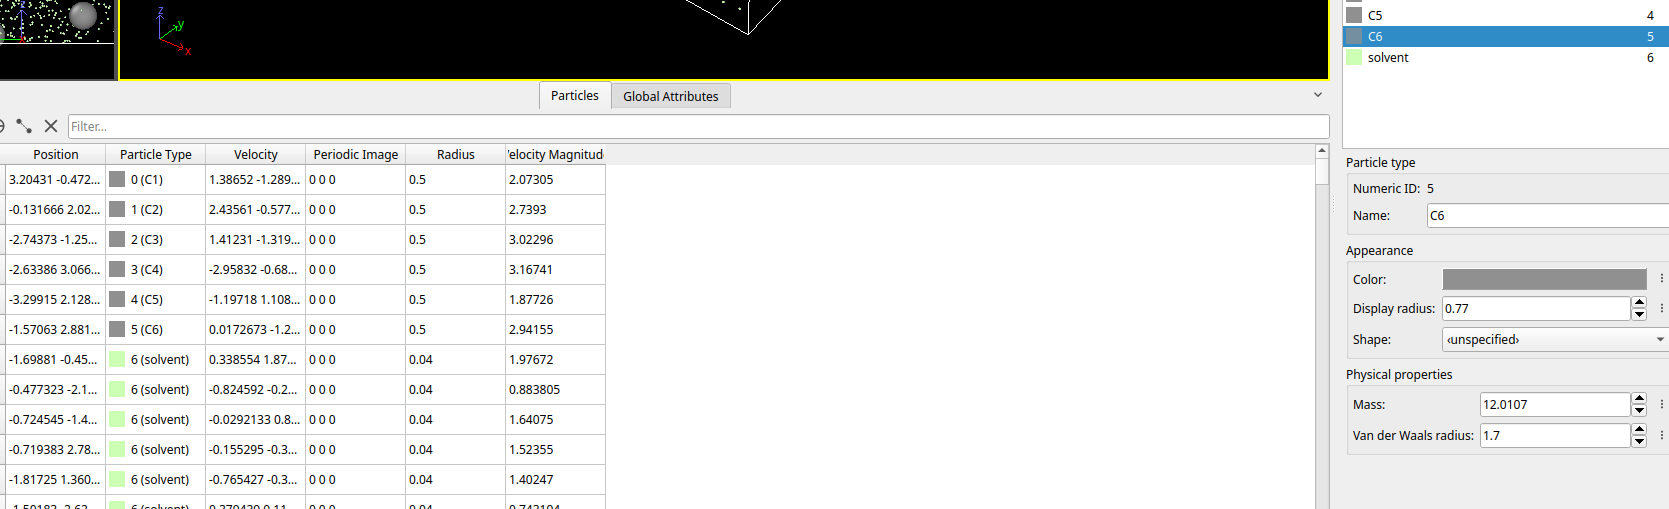
That said, I’m slightly puzzled about the “Particle Type” panel on the right—it doesn’t seem to display the correct radius. This is a bit confusing (as shown in the attached screenshot, where the left-hand Particles panel displays the correct radius of 0.5, while the right-hand panel shows a radius of 0.77). Perhaps the discrepancy exists to allow modifications to the radius for testing purposes or other experiments?
More importantly, I’m unsure how to permanently assign a color to each colloid, so I don’t have to reassign colors manually every time I open a trajectory after running a simulation. Any advice on this would be greatly appreciated!
The discrepancy in the radii you’re observing is due to how OVITO allows users to specify particle radii. Radii can be defined in several places: in the particles visual element, at the individual particle type level, or as a particle property where each particle has its own radius. These are listed in order from least to most specific. OVITO will always use the most specific radius definition when displaying particles. In your case, this means the particle radius defined at particle property level overrides the one set at the particle type level.
The easiest way to save and restore particle coloring is to configure it once using selection modifiers (by Type or Expression) along with the Assign Color modifier to set the appearance as desired. Afterward, you can save these modifiers as template.
This way, you can easily reapply the entire modifier collection and restore the desired appearance with a single click.
Many thanks for your reply! I followed your suggestion and here’s what I did:
I used a Selection Modifier specifically for the particle C1 (only C1 is selected in the Types panel), and I added an Assign Color modifier to set the color for C1. So two modifiers for C1.
I repeated the process of Selection modifier + Assign Color modifier for every particle type in my system.
Next, I saved my modifier template by naming it in the Application settings.
When I close and reopen Ovito with a new trajectory, to reapply the template, I navigate to Add Modification. At the end of the list, there’s a section called Modifier template, where my saved template is listed. By clicking on it, the template is applied instantly.
This is exactly what I wanted to do. Really great!
What I have to figure out now is how to modify an existing template? Say, my template applies on 6 particle types and I want to add one more because my trajectory is made of 7 particle types?
In that case, you can apply your existing template, make changes or additions to the pipeline, and then save the template again. If you give the template a new name, you’ll create a new template. If you reuse an existing name, you can update an existing template.